
Recipe: Navy bean buns
Ingredients:
- 1 cup unbleached flour
- 2 TB non-fat milk powder
- 1 TB honey powder
- 1/4 tp table salt
- 1 tp active dry yeast dissolved in 1 TB warm water
- water roux made from 1/2 cup water and 2 TB flour
- 1 egg
- 1 TB butter, melted
- up to 1/2 cup unbleached flour for dusting
Navy bean paste:
- 1/2 cup navy beans, very cooked
- 2 TB sugar
- 2 tp oil
Procedure:
To prepare navy bean paste:
Use a fork to flake the navy beans and stir until it forms a paste. Blend in sugar and oil. Stir the mixture on heat until the proper texture is reached. Cool to room temperature before use.
To prepare the dough:
1. Mix together 1 cup of unbleached flour, milk powder, honey powder, salt in a bowl.
2. Dissolve active dry yeast in warm water. Then add to the dry ingredients.
3. Add water roux and egg to the mixture. Stir to mix until a dough is formed. Knead the dough until gluten has developed.
4. Add in melted butter and continue stirring.
5. Pour dough out on a counter dusted with flour. Knead gently until the dough does not stick to the hands. May add up to 1/2 cup of flour during kneading.
6. Roll dough out and use a cup to cut out round pieces.
7. Add small balls of navy bean paste onto each piece of dough. Wrap up the filling to form a smooth ball. Then place the folded side down on parchment paper. Brush the top of each ball with melted butter.
8. Allow to proof until dough has risen some.
9. Preheat oven to 450F. Bake the rolls at 400F for 10-15 minutes.
10. Allow to cool and eat.
Results:
Preparation of the navy bean paste, the paste should be thick enough to stand as one lump:

Navy bean paste and water roux ready to use:

The egg, water roux, and moistened yeast are added to the dry ingredients:

Stirring the ingredients for 6 minutes to develop gluten:

Butter is added after gluten is formed:

Dough has a very silky feel, but may not be strong enough for making the rolls:

Dough is rolled out and cut into round pieces using a glass:

Filling is added to dough, this amount of filling is about right per piece of dough:

Bottom of a dough ball after wrapping up the filling:

Dough brushed with butter, to be proofed:

Dough proofed 20 minutes:

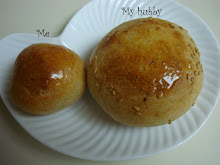
Rolls baked 15 minutes:

Rolls' top and bottom look when done:

The inside look of a roll:

Observations:
1. The total of 20 minutes proofing time is obviously not long enough. I should have allowed the dough ample time to proof once before rolling it out to make the balls. And then let the filled dough proof again. The texture of the buns is very heavy, almost like cookies, after baking.
2. The flavor of the bun is good. It has a fine taste of saltiness and sweetness.
3. The filling is at the right consistency and thickness. It softens when heated, and becomes just nice when out of the oven. The filling is sweet enough to stand out against the taste of the bun.
No comments:
Post a Comment