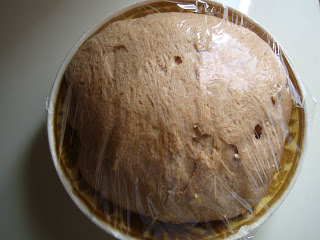
Recipe: Sweet potato walnut whole wheat loaf (make 1 medium loaf)
Ingredients:
- 2 cups King Arthur whole wheat flour
- 1 cup King Arthur bread flour
- 1/2 tp active dry yeast
- 5 TB non-fat dry milk powder
- 1 TB crushed walnuts
- 3/4 tp salt
- 1/4 cup sweet potato, mashed and boiled with 1/4 cup water into a thick paste
- dash of cinnamon
- 1 TB olive oil
- 3/4 cup + 2 TB warm water
Procedure:
Day 1
1. Dissolve 1/2 tp active dry yeast in 2 TB warm water.
1. Dissolve 1/2 tp active dry yeast in 2 TB warm water.
2. Mix whole wheat flour, bread flour, dry milk powder, crushed walnuts, cinnamon and salt in a medium bowl.
3. Add sweet potato, dissolved active dry yeast and 1/2 cup warm water into the dry ingredients in the medium bowl.
4. Mix the ingredients to form a dough. Incrementally add 2 TB of warm water at a time while mixing the dough. Give the dough about 15-20 seconds to hydrate.
5. After the dough has formed, allow it to rest a few minutes and then knead for 1 minute. Repeat this a few times until dough has become smooth.
6. Add 1 TB olive oil and rub the oil into the dough.
7. Allow dough to rest at room temperature for a little while. Then cover it with plastic wrap and allow to chill in fridge overnight.
Day 2
Punch dough down once. If too dry, add water. Then allow it to rest on the counter for a short time, about 30 minutes. Then let it continue to rest in the fridge.
Day 3
1. Take dough out to warm on the counter for several hours (8 hours).
2. Grease a pan with butter, then dust with flour.
3. Shape the dough into a log. Be careful not to punch down the holes. Place the dough in the greased pan to proof.
4. Preheat oven to 450F.
5. Bake loaf at 350F for 30 minutes. Allow to cool before serving.
Result:
Day 1, 8:30pm, mashed sweet potato, about 1/4 cup:
Day 1, 8:51pm, mashed sweet potato cooked in water until it's boiling (to kill any bacteria and to make it a little drier):
Day 1, 8:54pm, crushed walnuts:
Day 1, 8:56pm, initial mix of the ingredients:
Day 1, 9:29pm, initial dough made:
Day 1, 9:45pm, because this dough seems so dry, I open up the dough to rub in the oil:
Day 1, 9:50pm, final dough made, with a very tough texture:
Day 1, 10:04pm, final dough ready to rest:
Day 2, 1:59pm, final dough rested overnight:
Day 2, 2:00pm, texture of final dough:
Day 2, 2:05pm, dough is too dry, extra 1-2 TB water added, and dough punched down and reworked:
Day 3, 05:52am, dough taken out of the fridge to warm up on counter top:
Day 3, 8:42am, dough warmed for 3 hours:
Day 3, 1:38pm, dough warmed for 8 hours:
Day 3, 1:54pm, dough shaped into a log and oiled, to proof in a pan greased with butter and dusted with flour:
Day 3, 1:54pm, height of the dough just after shaping:
Day 3, 2:54pm, dough risen for 1 hour:
Day 3, 3:01pm, dough's height after 1 hour of rising:
Day 3, 3:01pm, dough scored before baking:
Day 3, 3:32pm, loaf baked 30 minutes, top is covered with foil after the first 10 minutes:
Day 3, 3:33pm, height of loaf after baking:
Day 3, 3:34pm, bottom of loaf:
Day 3, 3:34pm, end of loaf:
Day 3, 3:35pm, side of loaf:
Day 3, 5:02pm, loaf yields 13 slices:
Day 3, 5:01pm, side view of the slices:
Day 3, 5:01pm, a center-of-loaf slice:
Day 3, 5:01pm, an end-of-loaf slice:
Observations:
1. Throughout the making and kneading of this dough, it appears that the dough is always very tough. I do not know if it's because of insufficient water or because of the use of bread flour.
2. On the third day, after allowing the dough to rise for 8 hours, the dough has expanded tremendously. Moreover, the texture and the strength of the dough makes it very easy to handle. It can be shaped without deflating too much, like what happens to the softer doughs.
3. I cover the top of the loaf after the first 10 minutes of baking. This prevents the top from over-browning.
4. The sweet potato gives the loaf a unique reddish brown color. The loaf also has a lovely sweet aroma of baked sweet potato during baking.
5. Judging from how the loaf holds its shape during the baking period, I think this dough has the perfect composition for hearth baking.
6. This loaf has a much closer crumb. The air bubbles in the bread are very fine. The loaf does not have much of an oven spring, and doesn't rise as much as my other loaves using the same amount of yeast (1/2 tp). I think the hydration level is the cause.
7. The taste of the loaf is not bad. It does not taste quite as sweet. The taste of wheat is strong. I think 1 TB of honey does a lot more to sweeten the bread than 1/4 cup of sweet potato.
8. A little tunnel seems to run through the center of the loaf. This is probably due to the rolling. I roll the dough out into a rectangle and then roll it into a log. I do it this way this time because the strength of this dough allows me to shape it.


