Saturday, January 30, 2010

My first bread baking lesson: a simple white loaf


Being absolutely determined to get it, I start my bread baking lesson on "back to basic". Here is my first white loaf, following a new baker's primer on the web called Your first loaf .

Recipe: My first white loaf (make 1 loaf)
- 3 cups unbleached all-purpose grocery-store brand flour
- 1+1/8 cup water, warm enough to nearly scald the hand
- 2 teaspoons kosher salt
- 2 teaspoons active dried yeast

Procedure:
1. Mix yeast with flour in a large bowl.
2. Dissolve salt in 1 cup of water. Then pour into bowl and mix with flour. Form a sticky mass. When most of the flour has incorporated into a mixture, add the remaining 1/8 cup of water if necessary.
3. When the dough start cleaning off the bowl, put it on the counter and start kneading. The dough should be very smooth. The warm water gives the yeast a good temperature to start working.
4. Knead for 10 minutes or so. The dough becomes elastic and warm.
5. Set aside in a greased bowl. Covered with damp cheese cloth, and then a dry towel to keep warm on the counter. Room temperature is about 69-70F.
6. The first rise takes 45 minutes to 2 hours for the dough to double. Punch it down and gently fold it. Dough has now a different texture from before rising.
7. The second rise takes about 45 minutes to 2 hours also for the dough to double its volume.
8. Shape dough into a long roll and set it in a greased loaf pan. Allow to rise to double before baking.
9. Preheat oven to 375F. Brush an egg wash of one beaten egg on top. Then bake in middle rake for 35 minutes.
10. Allow to cool for 30 minutes. Slice, serve and freeze the remainder right away.

Result: Here is my tracking of the process.

12:29pm: The dough needs no extra water or flour. It starts to clean off the bowl and the hand after a few minutes of kneading. 

12:33pm: The texture of dough when stretched

12:35pm: Preparing dough for first rising. Pay attention to the size.

12:36pm: Covering dough with warm damp cloths for first rising

1:55pm: Dough has doubled its size after a little more than 1 hour

1:57pm: Dough is punched down and kneaded again.

1:57pm: Dough preparing for 2nd rising

3:16pm: Size of dough has not doubled after 1+1/2 hours of 2nd rising

4:40pm: Dough finally doubles its size after 3 hours of 2nd rising. It has a distinctive smell of fermentation.

4:58pm: Texture of dough just before shaping

5:05pm: Folding dough to avoid destroying all the bubbles

5:06pm: 1/2" big gas bubbles that still remain in dough after folding

5:12pm: Dough set in baking pan for proofing

5:12pm: Height of dough before proofing

6:16pm: Dough after 1 hour of proofing

6:16pm: Height of dough after proofing

6:28pm: Applying egg wash to dough just before baking

6:29pm: Height of dough just before baking

7:03pm: Loaf comes freshly out of the oven

7:03pm: The other side of the loaf when it comes freshly out of the oven

7:04pm: Bottom of the loaf when freshly out of oven

7:04pm: Height of loaf when freshly out of the oven

7:04pm: A sideway view of the loaf when it just comes out of the oven. When knocked, the loaf does not sound quite hollow, but there is some faint echo.

7:46pm: Loaf allowed to cool for 30 minutes and then sliced

7:47pm: A detailed look of the texture of the loaf after slicing

Remarks:
The result of this experiment is very good on the whole. This experiment is simple enough that I can observe the stages very carefully.

  1. I used a new bottle of instant dried yeast. That may be why the dough rises well. 
  2. I kept the dough on the counter at room temperature, about 69-71F. The 1st rising was much faster than the 2nd, possibly because of the warm water used when making the dough. During the 2nd rising, the bowl and the cloth were a little cold to the hand after a few hours on the counter. That may be why the dough rose slowly. There was a distinctive smell of fermentation during the 2nd rising.
  3. Dough folds very neatly after the 2nd rising. I shaped the dough gently in order not to destroy all the bubbles. Dough continued to grow while proofing. It did not get out of shape. Throughout the whole process from kneading to proofing, no additional water or flour was needed. 
  4. I did not score the loaf, thinking that it would not be necessary in a pan. Unfortunately, I was wrong. 
  5. The holes in the bread were a bit smaller than I expected, considering the effort I had made to let it rise twice, and to fold it gently. I might have taken too long to fold (about 5-10 minutes).
  6. The bread tasted plain, but was good with butter. The crust already started to stale 30 minutes after it comes out of oven.
At the end of the day, my greatest joy is that my dear husband is willing to help me consume this loaf through the rest of the week. It's his support that encourages to press on for excellence. In my next experiment, I will use warm milk to substitute the water. Or I might try an overnight fermentation with the same ingredients. We'll see.


Thursday, January 28, 2010

What's wrong with my loaf?

I am determined to learn how to do homemade bread with the same proficiency as my stir-frying. It means not just getting it "right" by following a recipe, but rather getting it the way I want it to be when I don't follow someone else's recipe! As with everything, practice alone makes perfect. This time, I try making cheese bread again, with a different approach. The basic recipe is from the Panera's three-cheese bread. I had some good success with its sponge-dough method when I followed the recipe closely. This time, I have much less yeast (only 2 teaspoon). But I have plenty of time! So I am going my own way!


Experimental Recipe: Parmesan cheese bread (make 1 loaf)

Ingredients:
Starter
- 1/2 cup warm water
- 1 teaspoon (tp) active dried yeast
- 1/2 cup all-purpose white flour
Dough
- 2 tablespoon (TB) honey
- 1 tp active dried yeast
- 2 TB and 1/2 tp unsalted butter
- 2.25 cup all-purpose white flour
- 1.5 tp salt
- 1/2 cup Parmesan cheese powder
- about 1/2 to 1 cup water

Procedure:
1. To prepare the starter: mix warm water, yeast and flour to form a liquid paste in a mug. Place in a warm water bath with cover to allow to rise to double the volume. It takes about 30 minutes.
2. To prepare the dough:
- mix flour, salt and cheese powder in a large bowl. Cut butter into very small pieces.
- Dissolve honey in equal amount of warm water, add yeast to the honey mixture. 
- Once the starter has doubled its volume, add starter, dissolved honey, yeast and chopped butter into the large bowl. Mix with hands to incorporate with the flour mixture until everything is fully blended together to form a dough that cleans off the bowl. 
- Knead dough vigorously for 30 minutes. Add water/flour accordingly, until dough is smooth and elastic.
3. First rising: Preheat oven to 150F and then turn heat off. Set dough in a greased pan. Cover with damp cheese cloth and set in warm oven for a few hours. Moist cheese cloth periodically.
4. Second rising: When dough has doubled and turned soft, take dough out of pan and knead again for 5 minutes. This time, dough should be very moist and spongy. But it is also cohesive, does not stick to the pan or the workplace. Grease the pan again if necessary. Replace dough in pan and cover with damp cheese cloth. Add a damp towel on top of pan without touching the cheese cloth to keep the moisture. Allow to rise again in oven until double.
5. Bake: After dough has doubled again, take the pan out of oven. Heat up oven to 450F. Put pan back into oven. Bake loaf at 400F for about 8 minutes. Turn heat down to 350F. Bake for another 15-20 minutes.

Result:

After the 1st kneading, dough appears to be in very good shape and texture:

This is the size of the dough with respect to the pan before the 1st rising:

After 4 hours in warmed oven, dough has risen with a good shape, but not doubled in volume:

Dough is then punched down and kneaded again for 5-10 minutes, then set in pan for 2nd rising:

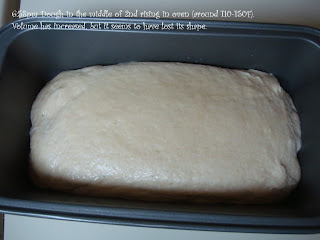
During 2nd rising: after 1 hour and 30 minutes, dough has risen again, but it is getting out of shape:

After another 1 hour, dough has gotten so unbearably out of shape that I decided to bake it without delay:

After baking for 20-25 minutes, loaf is done, but its volume has not expanded significantly.

The taste of the bread is a little heavy. This is the texture of a slice at one end of the loaf, about 25 minutes after the loaf comes out of oven:

This shows the difference in texture between the end-part (middle) and the center-part (left) of the loaf. The crust is shown on the right side.

This shows the texture of different different parts of the loaf after slicing:

In summary, I have observed the following:
  1. The starter is prepared the same way as the Panera recipe. The yeast mixture almost doubles in 30 minutes.
  2. This time I use about 1/2 the amount of yeast in the dough, compared with the Panera's recipe for the same loaf. So the total amount of yeast used for the whole loaf is 2 tp instead of 3 tp. But I give more time for the dough to rise, and I allow it to rise twice. 
  3. The first rising takes 4 hours. I preheat the oven to 150F. Then I turn the oven off and allow the dough to sit undisturbed throughout. The dough seems to do well in the 1st rising. It maintains its shape pretty well. But at the end of the 1st rising, it has not risen to the volume I'd like to see. I do not know if it's due to the age of my yeast (it's a few months old). But the fact that it still rises means it's alive.
  4. The second rising takes 2.5 hours. I reheat the oven to 150F and allow the dough to sit through, mostly undisturbed, with occasional peeking in. Apparently, if the dough is left to itself for too long, it gets flat. This happens during the 2nd rising. I am not sure if the oven temperature has contributed to the flatness. I should have knocked it down again and knead it before baking.
  5. The large holes in the loaf shows that the gluten in the loaf has indeed trapped the gas from the yeast. I am happy to see it. But I would like to see more of it at the center part of the loaf too.
Next experiment:
I'm going to try again with some new yeast. This time it will be a white bread.

Thursday, January 21, 2010

Trying out Panera's three-cheese bread a second time

When I made Panera's three-cheese bread the first time (following the recipe on their website), the biggest criticism I received from my food critic was: "Where's the cheese?" The cheeses in that recipe were in big chunks, which may not distribute evenly over the bread. I gathered that it might be a better idea to use a mixture of grated and cubed cheeses. So here comes my second experiment on this same bread. In this experiment, these are the few things I try out:

1. I keep the starter in a warm water bath with lid. This allows the starter to rise pretty fast.
2. I use unsalted butter instead of shortening. In principle, shortening give the bread more rise than butter. But butter has its own characteristic flavor not found in shortening.
3. When making the dough, I mix the yeast into the flour instead of the honey mixture.
4. I use a mixture of grated and cubed cheeses.

Recipe: Cheese bread again (adapted from Panera's three-cheese bread recipe, make 1 loaf)

Ingredients:
Starter
- 1/2 cup warm water
- 1 teaspoon (tp) dried yeast
- 1/2 cup all-purpose white flour
Dough
- 3/8 cup warm water
- 1.5 tablespoon (TB) honey
- 2 tp dried yeast
- 2 TB and 1/2 tp unsalted butter
- 2.25 cup + 2 TB all-purpose white flour
- 1.5 tp salt
- 1/2 cup grated low-moistrure part-skim mozzarella, provolone, parmesan, asiago, fontina, romano cheeses
- 1/2 cup cubed mix of whole milk cheddar and reduced fat mozzarella
- starter (prepared from ingredients above)
- 1/3 cup water

Procedure:
1. To prepare the starter: mix warm water, yeast and flour to form a liquid paste in a mug. Place in a warm water bath with cover to allow to rise to double the volume. It takes about 30 minutes.
2. To prepare the dough:
- mix flour, salt and yeast thoroughly in a large bowl. Dissolve honey in 3/8 cup of warm water. Set aside. Cut butter into very small pieces.
- Once the starter has doubled its volume, add starter, dissolved honey and chopped butter into the large bowl. Mix with hands to incorporate with the flour mixture. If the mixture seems too dry, add about 1/3 cup of warm water and keep mixing until all ingredients (especially the butter) are fully blended together.
- Once the mixture has incorporated into a dough and has started "cleaning off" the bowl, add in the cheeses in 2 batches. Knead vigorously to incorporate each batch before adding the next batch.
- After adding the cheeses, knead the dough until it's smooth and elastic. The heat generated by the yeast may warm up the cheeses and butter. Set the finished dough in a greased pan. Cover with wet warm towel and keep in a slightly heated oven for 30 minutes. Bake in oven at 400F for 20 minutes.
- Allow to cool for 30 minutes before serving.


Results:
1. This time my dough turns out to be very very moist. It might be because of the increased temperature I use for warming the starter, or because of the butter which contains water. I only add 1/3 cup of extra water when forming the dough. Perhaps I should even cut that out next time.
2. After kneading the dough, I cover it with a damp warm cloth and allow it to rise in the oven. Because of the moisture of the dough, the dough eventually gets stuck to the cloth. The mild heat used during the 30 minutes of rising time also allows the dough to rise pretty rapidly. At the end of the rising time, some of the cheese cubes have slightly melted and the dough is very fluid. I have to reshape the dough with some extra flour. The dough continues to rise rather rapidly after reshaping. I moist the surface with a damp cloth. Then quickly set it in the oven to bake.
3. Despite the setback, the loaf comes out nicely after baking at 400F for 20 minutes and cooling for 30 minutes. The bread has a nice texture, with a thin crust. The cheese within has somewhat melted, giving rise to big holes. I can distinctively tell the different flavors of mozzarella and cheddar in this loaf.
4. In my next experiment, I would keep the temperature warm, and reduce the amount of yeast by 1/3, and probably drop off the extra water.

It's hard to describe how comforting it is to smell the aroma of baked goods in a dark winter evening. Especially for someone who is down with a cold, the warmth of home is a glimpse of heaven.

Monday, January 11, 2010

Trying Panera's three-cheese bread recipe

At our church's congregational dinner, a friend brought a loaf of cheese bread which tasted extremely delicious. It's the three-cheese bread from Panera. I was so impressed, I simply could not forget its taste after weeks. One day I found out that Panera actually has the three-cheese bread recipe (from "The Panera Bread Cookbook) on its own website. The recipe makes two loaves. As a start, I tried out making one loaf. I also replaced the three cheeses with the two available at home. The following is my experimental recipe.


Recipe: Cheese bread (adapted from Panera's 3-cheese recipe, make 1 loaf)


Ingredients:
Starter
- 1/2 cup warm water (warm to touch)
- 1 teaspoon (tp) dried yeast
- 1/2 cup all-purpose white flour
- 1/2 tp sugar
Dough
- 3/8 cup warm water
- 1.5 tablespoon (TB) honey
- 2 tp dried yeast
- 2 TB and 1/2 tp shortening
- 2.25 cup + 2 TB all-purpose white flour
- 1.5 tp salt
- 3/4 cup reduced fat feta and cheddar cheeses, cut to 1/2" cubes
- starter (prepared from ingredients above)
- 1/2 cup water


Procedure:
1. To prepare the starter: mix warm water and yeast in a bowl, and stir until yeast completely dissolve. Add 1/2 tp sugar to feed the yeast. Add flour to incorporate fully, forming a thick paste. Let sit at warm area for 30 minutes (I leave it in a toaster oven that has been heated up gently.)
2. To prepare the dough: sieve or mix flour and salt in a large bowl. Set aside. Mix water, honey and yeast in a small bowl and stir to dissolve the yeast completely. Add the honey yeast mixture to the large bowl. Add shortening, cheese, and fermented starter to the bowl. Mix together all the ingredients until they incorporate. Add small amount of water if necessary (up to 1/2 cup) while mixing. Once all the ingredients have incorporated, knead in the bowl until the dough becomes moist and elastic. Kneading takes about 5 minutes.
3. Heat oven to 150F for a few minutes. Turn heat off. Roll the dough into a smooth ball. Do not flatten. Place it on a greased baking sheet, cover the surface of dough with a warm very damp cloth (damp enough that water can be squeezed out, but not dripping), and let sit for 30 minutes. Then remove cloth. Dough will rise noticeably, but will not double its volume. Score the loaf with a sharp knife to allow for expansion during baking. Heat up oven to 400F and bake for 20 minutes or until top is nicely brown. Then allow to cool for 20-30 minutes before slicing. Some cheese may ooze out and burn while baking. Discard burnt parts when served. 


After making the loaf, I've made a few observations:


1. I've noticed in Panera's recipe that this recipe is meant for quick baking. In traditional recipes that use the "straight dough method", the bread dough is allowed to rise at least twice, each time for 1 to 2 hours until its volume doubles. I guess this is compensated in this recipe by using the starter (this is called "the sponge method"). When I first studied the recipe, I did not know that 100% fresh yeast = 50% dried yeast = 33.3% instant yeast. So I substituted the original recipe's fresh yeast with equal amount of dried yeast (which gives a the large quantity of yeast). An immediate and desirable result is that my loaf rises very well within a short time. (Perhaps that's exactly what is needed; my yeast is old because I use it so infrequently.)


2. A dough is formed when it starts "cleaning the bowl", that is, pulling bits of flour mixture off from the mixing bowl onto itself. Once formed, the dough needs to be kneaded for about 5-10 minutes. I do the kneading in the large bowl because I like the curvature. To test the doneness of dough, stretch it with fingers and let go. If it pulls back easily, it's basically done.


3. With my choices of cheese, the cheddar melts really nicely in the bread, while the feta remains in crumbs. The chemistry behind this is that lower-fat cheeses tend to toughen as they are heated (I think that's what happened to the feta), so they may not be good candidates for cooking. But among the choices of whole milk cheeses, I suspect that Cheddar may "oil off" under high heat because of its fat content, which may happen if the bread is baked longer. Next time I may try Panera's 3 cheeses: Romano, Parmesan and Asiago. These three are very hard ripened cheeses, which may melt and blend more easily when heated.


4. When the loaf came out of the oven, I was so excited that I started cutting it right away. However, the interior was still too moist and was smudged under the pressure of the knife. Once the bread cooled down, the texture became much better. That's why it's absolutely necessary for the bread to cool before serving.


5. For reasons yet to be understood, this bread is baked at 400F throughout, instead of the usually recommended 400F for 10 minutes followed by lower temperatures 325-375F for 25-30 minutes. Because of the high temperature, my baking time is shortened to 20 minutes. The high temperature gives the bread a very nice golden crust. However, at such temperature, cheeses on the surface burn easily. I believe that the thick crispiness of the crust comes from my covering the dough with a very damp cloth. The cloth is damp enough that water can be squeezed out, but not dripping. So, after proofing, the dough surface is smooth and moist, but not stuck to the cloth. 


6. The entire process from preparing the ingredients to serving can be done within 2 hours, which is considered really fast for yeast bread:

  • 30 minutes of starter preparation;
  • 10 minutes of dough preparation;
  • 30 minutes of dough rising;
  • 20 minutes of bakng;
  • 30 minutes of cooling 
7. Following recommendations by the Panera cookbook, I slice the unfinished loaf and freeze it wrapped tightly in double plastic. For full unsliced loaf, it is recommended that the loaf be defrosted 2-3 hours before serving. For individual slices, 30 minutes at room temperature is enough. After defrosting, moist the entire surface with water (do not soak). Then reheat the entire loaf in oven at 400F to restore the crispiness of the crust, or use toaster oven to toast individual slices. 


As my first attempt, I did not get the same impressive bread that is sold at the store. Some reviewers of "The Panera Bread Cookbook" have remarked that most of the recipes in this cookbook are not authentically Panera. But for a beginner, it's fun enough to discover new things. I also like these recipes because of their general nutrition consciousness. This cheese bread is not dripping with fat. :)


A day or two later, reminiscing the taste of the Panera bread I ate earlier (which motivated me to try out this recipe), I couldn't resist walking in to the store to pick up a three-cheese demi for lunch. To my surprise, the demi from the store did not taste all that different from the homemade loaf that I just ate for brunch that same morning, except for the differences in texture and cheeses. Perhaps it's really the impression that matters! Now I'm pretty convinced that the recipe is close enough.