

From Wikipedia's entry on potassium bromate KBrO3:
Potassium bromate is often added to flour by commercial bakers as an improver that strengthens the dough and allows higher rising. It is an oxidizing agent and will be completely used up in the baking bread under the right conditions. However, if too much is added or if the bread is not cooked long enough at a high enough temperature, then a residual amount will remain which may be harmful (carcinogenic) if consumed. In the US, its use has not been banned because the use of it was sanctioned by the FDA before the Delaney clause of Food, Drug and Cosmetic Act went into effect in 1958.
From King Arthur Flour company:
If you are a baker who has never used bromated flour then you have nothing to worry about. If you are a baker currently using bromated flours and would like to switch you will have to make some slight adjustments to your mixing process, but in our view the effort is worth it as you will be able to provide your employees a safer working environment, and your customers with a healthier product.
The only changes that most bakers find they need to make are slightly longer mixing times. Bromate, being and oxidizer, rapidly strengthens the dough in the mixer bowl thus reducing mixing times. Thus, doughs made from unbromated flours will require slightly more mixing to achieve the same strength. As you do not want to increase the final temperature of your dough through this additional mixing you must lower your initial water temperature. Those changes should be all that is required by you to make the switch.
Some bakers find that they don’t have as much fermentation tolerance using unbromated flour. there are two fixes for this. One is to use preferments in your dough. This increases the acidity of your dough giving it m ore tolerance for longer proof times and overnight retarding. If this doesn’t fit your production requirements then you can consider us ing ascorbic acid (Vitamin C). Ascorbic acid is a slow acting oxidizer so you won’t get much benefit in the mixer but your dough will have more tolerance to overnight retarding.
Tuesday, March 23, 2010

Autolyse
Now I am enjoying baking so much, I am trying out a variety of ways to bake bread. This time, I'm studying the autolyse of dough. The key is to make a wet dough and allow the gluten to form by itself.
Ingredients:
- 2 cup of Giant brand unbleached wheat flour
- 3/4 cup + 2 TB warm water
- 1 teaspoon (tp) active dry yeast
- 1/2 tp coarse kosher salt
Procedure:
1. Mix the yeast with about 2-3 TB warm water. Allow to moisten for a few minutes.
2. Mix flour and salt in a bowl.
3. Add the yeast liquid into the bowl. Mix. Add some more water, up to 1 cup.
4. Stir the mixture a little with a fork to make sure the flour is moistened with water. Allow to sit.
5. Stir the mixture every 10 minutes. Observe the increase of smoothness and stretchability of the dough.
Results:
2:26pm, yeast is proofed in warm water:

2:27pm, yeast is added to the flour mixture. Observe the bubbles that spring up right away:

2:33pm, sufficient water has been added to hydrate the flour to form a wet dough. Observe the initial lack of strength of the dough:

2:44pm, dough has been allowed to rest undisturbed for 10 minutes. Observe the smoothened texture of the dough after the 1st rest:

2:47pm, dough is being folded and stretched:

2:47pm, observe the strength of the dough after the 1st stretch:

2:57pm, dough has been allowed to rest undisturbed for another 10 minutes. Observe the strength of the dough after the 2nd rest:

3:10pm, dough is being folded and stretched a second time:

3:10pm, observe the strength of the dough after the 2nd stretch:
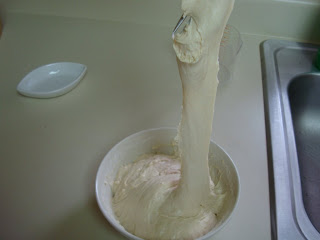
3:10pm, dough is now able to sustain the stretch by its own weight:

3:11pm, dough is done, ready to chill or rise, depending on the recipe:

Observations:
My current batch of flour (Giant's store brand unbleached all-purpose flour) needs less water than my previous batch (Gold Medal unbleached all-purpose flour) to arrive at the same level of hydration. It also takes a shorter time for the dough to arrive at the strength that I like to see.
Ingredients:
- 2 cup of Giant brand unbleached wheat flour
- 3/4 cup + 2 TB warm water
- 1 teaspoon (tp) active dry yeast
- 1/2 tp coarse kosher salt
Procedure:
1. Mix the yeast with about 2-3 TB warm water. Allow to moisten for a few minutes.
2. Mix flour and salt in a bowl.
3. Add the yeast liquid into the bowl. Mix. Add some more water, up to 1 cup.
4. Stir the mixture a little with a fork to make sure the flour is moistened with water. Allow to sit.
5. Stir the mixture every 10 minutes. Observe the increase of smoothness and stretchability of the dough.
Results:
2:26pm, yeast is proofed in warm water:

2:27pm, yeast is added to the flour mixture. Observe the bubbles that spring up right away:

2:33pm, sufficient water has been added to hydrate the flour to form a wet dough. Observe the initial lack of strength of the dough:

2:44pm, dough has been allowed to rest undisturbed for 10 minutes. Observe the smoothened texture of the dough after the 1st rest:

2:47pm, dough is being folded and stretched:

2:47pm, observe the strength of the dough after the 1st stretch:

2:57pm, dough has been allowed to rest undisturbed for another 10 minutes. Observe the strength of the dough after the 2nd rest:

3:10pm, dough is being folded and stretched a second time:

3:10pm, observe the strength of the dough after the 2nd stretch:

3:10pm, dough is now able to sustain the stretch by its own weight:

3:11pm, dough is done, ready to chill or rise, depending on the recipe:

Observations:
My current batch of flour (Giant's store brand unbleached all-purpose flour) needs less water than my previous batch (Gold Medal unbleached all-purpose flour) to arrive at the same level of hydration. It also takes a shorter time for the dough to arrive at the strength that I like to see.
Saturday, March 20, 2010
Sweetwater cheese bread
This is one of the breads that I'd like to be able to make one day. Just look at the crust, and how the cheeses and fresh herbs melt together into the crumb!


Thursday, March 18, 2010
Loaves of love
A family friend that we hold very dearly to our hearts just lost one of her loved ones. We feel the grief and the pain for her. Whenever I feel for someone, the desire to show my care drives me to cook for them some comfort food. That, according to my husband, is my love language---the way I tell people I love them. Thus come these loaves. It's a joy to make them; it's a joy to love.

For these loaves, I've prepared a 3-day pre-ferment using 2 cups of unbleached flour, 1 tp of active dry yeast, 1/2 tp salt and about 1 cup of water. This amount of pre-ferment is enough to make a medium sandwich loaf and all of these small loaves. The pre-ferment is described in my 13th experiment. These small loaves all together use about half the pre-ferment.
Preparation: Basic white dough using pre-ferment (total 3 cups of flour and 1.5 tp yeast)
Ingredients:
- half the pre-ferment (amounts to 1 cup of unbleached flour, 1/2 tp yeast, 1/4 tp salt, plus water)
- 2 cups white flour
- 1 tp active dry yeast
- 1/2 cup + 3TB warm water
Procedure:
1. Dissolve the yeast in 2 TB warm water. Add to the flour. Mix in the pre-ferment. Slowly work on the mixture to incorporate all the flour into a dough, adding a small amount of water at a time. Once the dough is ready, allow it to rest until its volume has increased by 1.5 times. Then gently punch down the dough and cut it into three pieces.
Recipe: Red bean almond bread (one small loaf)
Ingredients:
- About 1/3 of the white dough
- 2TB red bean paste
- 1/4 cup almond meal
- 6 tp brown sugar
- About 1 TB water to thin the filling if necessary
Procedure:
1. To prepare the red bean paste, boil soaked red beans in 5 times its volume of water. Simmer for 1-2 hours or until the beans have softened and opened up. Boil the liquid to almost dry. Mash the beans.
2. Mix the red bean paste with almond meal and sugar. Then set aside until used.
3. Dust the counter with flour. Place a piece of dough on the counter. Dust both top and bottom of the dough with a little flour. Roll out the white dough into a sheet of less than 1/4" thick. While rolling, add a little bit of pressure at a time. After each rolling, gently move the dough a little to prevent it from sticking to the counter. When done, allow the sheet to relax for a few minutes.
4. If the red bean almond filling is too dry, add a little water to soften it. Then spread the filling very thinly and uniformly on the sheet.
5. Roll up the sheet. Fold both ends downward and place in a small loaf pan to proof.
6. Pre-heat oven to 450F. Bake loaf at 400F for 15 minutes. (Note: high heat is needed for browning because the loaf is smaller. With low heat, the loaf could cook long before it browns.)
7. Allow to cool before slicing.
Recipe: Pesto bread (1 small loaf)
Ingredients:
- About 1/3 of the white dough
- 1 TB pesto sauce
Procedure:
Recipe: Sesame sweet buns (make 4, each about 2.5" to 3" wide)
Ingredients:
- About 1/3 of the white dough
- 1 egg
- 2 tp brown sugar
- 1/4 tp salt
- 1.5 TB butter
- 1 tp toasted sesame seeds
- 1/2 cup unbleached flour
- extra whole wheat flour, about 1/4 cup
Procedure:
1. Melt the butter. Add melted butter, salt and brown sugar and sesame seeds to the egg. Beat well. Add unbleached flour and stir to form a paste.
2. Add the white dough into the paste and stir to form a very sticky paste-like dough. Add extra whole wheat flour until the dough becomes strong enough to handle with hands.
3. Partition dough into small pieces and place each piece into a greased mold about 2.5" diameter. If the consistency of the dough is right, then it will stand well in the mold without spreading.
4. Allow the dough to proof in a warm place until the dough has risen by 1.5 times its original volume.
5. Bake at 400F for 5-10 minutes.
Results:
White dough
White dough prepared:

White dough rested 40 minutes:

White dough punched down:

White dough partitioned:

Red bean roll
Red bean almond filling prepared:

Red bean dough sheet:

Red bean dough with filling:

Red bean dough rolled up:

Red bean dough prepared to rest in greased mini-pan:

Red bean dough risen dramatically on warm stove top:

Red bean roll baked 15 minutes at 400F:

Red bean roll bottom:

Red bean roll top:

Pesto roll
Pesto dough sheet:

Pesto dough filling:

Pesto dough to proof:

Pesto dough baked bottom:

Sesame buns
Sesame bun initial dough mix:

Sesame bun dough ready:

Sesame buns in mold:

Sesame buns proofed on warm stove top:

Sesame buns baked:

Observations:
1. This white dough has a powerful oven spring. I think it's because of the extra 1 tp of yeast added to the final dough.
2. The thin fillings give a spiral interior to each of the mini-loaves. This time, the amount of red bean paste is just right. The loaf is not heavy. This helps it to rise very nicely.
3. Since the sesame buns have a higher percentage of fat and sugar than the lean loaves, I make the white dough first and make sure that gluten has developed before adding in the sugar, egg and butter. This might have explained for the huge oven spring of the buns in this baking.
4. A black baking pan absorbs more heat than a silver colored one. So the sesame buns are browned more in the bottom.

For these loaves, I've prepared a 3-day pre-ferment using 2 cups of unbleached flour, 1 tp of active dry yeast, 1/2 tp salt and about 1 cup of water. This amount of pre-ferment is enough to make a medium sandwich loaf and all of these small loaves. The pre-ferment is described in my 13th experiment. These small loaves all together use about half the pre-ferment.
Preparation: Basic white dough using pre-ferment (total 3 cups of flour and 1.5 tp yeast)
Ingredients:
- half the pre-ferment (amounts to 1 cup of unbleached flour, 1/2 tp yeast, 1/4 tp salt, plus water)
- 2 cups white flour
- 1 tp active dry yeast
- 1/2 cup + 3TB warm water
Procedure:
1. Dissolve the yeast in 2 TB warm water. Add to the flour. Mix in the pre-ferment. Slowly work on the mixture to incorporate all the flour into a dough, adding a small amount of water at a time. Once the dough is ready, allow it to rest until its volume has increased by 1.5 times. Then gently punch down the dough and cut it into three pieces.
Recipe: Red bean almond bread (one small loaf)
Ingredients:
- About 1/3 of the white dough
- 2TB red bean paste
- 1/4 cup almond meal
- 6 tp brown sugar
- About 1 TB water to thin the filling if necessary
Procedure:
1. To prepare the red bean paste, boil soaked red beans in 5 times its volume of water. Simmer for 1-2 hours or until the beans have softened and opened up. Boil the liquid to almost dry. Mash the beans.
2. Mix the red bean paste with almond meal and sugar. Then set aside until used.
3. Dust the counter with flour. Place a piece of dough on the counter. Dust both top and bottom of the dough with a little flour. Roll out the white dough into a sheet of less than 1/4" thick. While rolling, add a little bit of pressure at a time. After each rolling, gently move the dough a little to prevent it from sticking to the counter. When done, allow the sheet to relax for a few minutes.
4. If the red bean almond filling is too dry, add a little water to soften it. Then spread the filling very thinly and uniformly on the sheet.
5. Roll up the sheet. Fold both ends downward and place in a small loaf pan to proof.
6. Pre-heat oven to 450F. Bake loaf at 400F for 15 minutes. (Note: high heat is needed for browning because the loaf is smaller. With low heat, the loaf could cook long before it browns.)
7. Allow to cool before slicing.
Recipe: Pesto bread (1 small loaf)
Ingredients:
- About 1/3 of the white dough
- 1 TB pesto sauce
Procedure:
1. Dust the counter with flour. Place a piece of dough on the counter. Dust both top and bottom of the dough with a little flour. Roll out the white dough into a sheet of less than 1/4" thick. While rolling, add a little bit of pressure at a time. After each rolling, gently move the dough a little to prevent it from sticking to the counter. When done, allow the sheet to relax for a few minutes.
2. Spread pesto sauce thinly on the sheet.
3. Roll up the sheet. Fold both ends downward and place in a small loaf pan to proof.
4. Pre-heat oven to 450F. Bake loaf at 400F for 10-15 minutes. (Note: high heat is needed for browning because the loaf is smaller. With low heat, the loaf could cook long before it browns.)
5. Allow to cool before slicing.
Recipe: Sesame sweet buns (make 4, each about 2.5" to 3" wide)
Ingredients:
- About 1/3 of the white dough
- 1 egg
- 2 tp brown sugar
- 1/4 tp salt
- 1.5 TB butter
- 1 tp toasted sesame seeds
- 1/2 cup unbleached flour
- extra whole wheat flour, about 1/4 cup
Procedure:
1. Melt the butter. Add melted butter, salt and brown sugar and sesame seeds to the egg. Beat well. Add unbleached flour and stir to form a paste.
2. Add the white dough into the paste and stir to form a very sticky paste-like dough. Add extra whole wheat flour until the dough becomes strong enough to handle with hands.
3. Partition dough into small pieces and place each piece into a greased mold about 2.5" diameter. If the consistency of the dough is right, then it will stand well in the mold without spreading.
4. Allow the dough to proof in a warm place until the dough has risen by 1.5 times its original volume.
5. Bake at 400F for 5-10 minutes.
Results:
White dough
White dough prepared:

White dough rested 40 minutes:

White dough punched down:

White dough partitioned:

Red bean roll
Red bean almond filling prepared:

Red bean dough sheet:

Red bean dough with filling:

Red bean dough rolled up:

Red bean dough prepared to rest in greased mini-pan:

Red bean dough risen dramatically on warm stove top:

Red bean roll baked 15 minutes at 400F:

Red bean roll bottom:

Red bean roll top:

Pesto roll
Pesto dough sheet:

Pesto dough filling:

Pesto dough to proof:

Pesto dough baked bottom:

Sesame buns
Sesame bun initial dough mix:

Sesame bun dough ready:

Sesame buns in mold:

Sesame buns proofed on warm stove top:

Sesame buns baked:

Observations:
1. This white dough has a powerful oven spring. I think it's because of the extra 1 tp of yeast added to the final dough.
2. The thin fillings give a spiral interior to each of the mini-loaves. This time, the amount of red bean paste is just right. The loaf is not heavy. This helps it to rise very nicely.
3. Since the sesame buns have a higher percentage of fat and sugar than the lean loaves, I make the white dough first and make sure that gluten has developed before adding in the sugar, egg and butter. This might have explained for the huge oven spring of the buns in this baking.
4. A black baking pan absorbs more heat than a silver colored one. So the sesame buns are browned more in the bottom.
My 13th experiment - a 2:1 whole wheat bread
This is to me a great leap forward towards whole grains. I've started to rely less and less on recipes, but more and more on memory and "common sense" which really is experience. Here is my own recipe on a heartier whole wheat bread. It is by far the loaf that has the most whole wheat flour I've used---2 cups of whole wheat flour to 1 cup of unbleached flour. This loaf uses a 3-day pre-ferment that has a relatively large portion of yeast. The same pre-ferment can be used in more than one loaf.


Recipe: Hearty whole wheat sandwich bread (1 medium loaf)
Ingredients:
Pre-ferment (to be fermented for 2 days, use half in this recipe)
- 2 cups gold medal brand unbleached flour
- 1 tp active dry yeast
- 1 cup warm water
- 1/2 tp kosher salt
Soaker
- 2 cups grocery store brand whole wheat flour
- 2 TB buttermilk powder
- 1/2 tp salt
- 1 cup + 2 TB water
Final dough
Procedure:
Day 1
To make the pre-ferment by autolysis:
Stir the pre-ferment and punch it down once. Allow to continue chilling in the fridge.
Day 3
Results:
Day One 8:39pm, pre-ferment's volume after chilling 10 hours:

Day One 8:39pm, pre-ferment's non-stickiness to the bowl after chilling 10 hours:

Day One 8:40pm, pre-ferment's strength after chilling 10 hours:

Day One 8:43pm, pre-ferment punched down:

Day Two 10:29pm, pre-ferment's volume after 34 hours of chilling:

Day Two 10:30pm, pre-ferment's non-stickiness after 34 hours of chilling:

Day Two 10:30pm, pre-ferment's strength after 34 hours of chilling:

Day Two 10:30pm, pre-ferment's gluten development after 34 hours of chilling:

Day Two 10:34pm, pre-ferment punched down:

Day Three 8:39am, pre-ferment on the third morning (after 48 hours of chilling):

Day Three 9:03am, soaker mixed:

Day Three 11:40am, pre-ferment and soaker rested for 2 hours on the counter at room temperature 72F:

Day Three 11:45am, pre-ferment and soaker at initial stage of mixing:

Day Three 11:55am, pre-ferment and soaker mixed for 10 minutes:

Day Three 12:28pm, final dough ready to rest:

Day Three 1:13pm, final dough having rested in warmed oven for 40 minutes:

Day Three 1:16pm, final dough poured into 7.5"x3.5" greased loaf pan, added toppings, and waiting to proof:

Day Three 1:51pm, final dough proofed for 30 minutes (expanded but looked really flat):

Day Three 2:10pm, loaf baked 20 minutes (midway through):

Day Three 2:22pm, loaf baked 30 minutes (observe the large oven spring):

Day Three 2:24pm, loaf's bottom:

Day Three 2:24pm, loaf's side:

Day Three 2:26pm, loaf's Top:

Day Three 5:05pm, loaf being sliced, observe the thinness and the strength of the slices to stand:

Day Three 5:10pm, one loaf yielding 19 thin slices:

Day Three 5:10pm, a center-of-loaf slice (observe the large hole in the middle despite that the dough had been vigorously kneaded):

Day Three 5:10pm, an end-of-loaf slice (compare it with the center slice):

Observations:
1. This time, my loaf has 2/3 whole wheat flour, 1/3 unbleached flour. While resting and proofing, the dough looks a little flat (unlike white loaves). The oven spring of this loaf surprises me greatly.
2. In total, the amount of yeast used is 1/2 tp from half of the pre-ferment, and 1/8 tp during the mixing of the final dough. It's impressive to me how little the amount of yeast is used to give this oven spring and soft crumb. The 2-day pre-fermentation must have done the job.
3. In this loaf, I notice a few large holes in the crumb, even though the dough has been kneaded really vigorously when the pre-ferment and the soaker are mixed. Such mixing is necessary to make sure the two blend. I have kept both the pre-ferment and the soaker a little on the moist side so that the mixing is easier.
4. I really like the texture and the mouth-feel of this loaf. The particular combination of salt, honey and oil give it a great flavor. With a higher percentage of whole wheat flour, the loaf has a richer taste of grain, too.
5. I use a smaller pan because in total there are only 3 cups of flour in this loaf.
6. On the whole, this loaf is my big new step towards whole grain bread baking.

These are all the goods baked from the same pre-ferment:

Recipe: Hearty whole wheat sandwich bread (1 medium loaf)
Ingredients:
Pre-ferment (to be fermented for 2 days, use half in this recipe)
- 2 cups gold medal brand unbleached flour
- 1 tp active dry yeast
- 1 cup warm water
- 1/2 tp kosher salt
Soaker
- 2 cups grocery store brand whole wheat flour
- 2 TB buttermilk powder
- 1/2 tp salt
- 1 cup + 2 TB water
Final dough
- half of the pre-ferment
- all of the soaker
- 1/4 tp salt
- 1 TB oat bran
- 1/8 tp active dry yeast
- 1 TB honey
- 1 TB olive oil
- extra oat bran for toppings
Procedure:
Day 1
To make the pre-ferment by autolysis:
- Dissolve the active dry yeast in 2 tablespoons (TB) warm water out of the 1 cup. Allow to sit for 5 minutes. Meanwhile, mix flour and salt in a medium bowl.
- When the yeast has dissolved, add the yeast solution into the medium bowl. Add the remaining warm water into the bowl. Using a fork, mix the ingredients until the flour has mostly moistened.
- Allow the bowl to sit for 10 minutes. Then stir the flour mixture again a few times. Repeat this 3-4 times. At each time, use the fork to try to lift up the flour mixture. At first, the weight of the mixture will cause the mixture to break very quickly. The mixture can hardly be called a dough at the beginning. But gluten forms gradually. The dough becomes smoothly, and can stretch longer before it breaks. Eventually, it is possible to lift up the whole dough without breaking.
- Rub the top of the dough with a few drops of oil. Cover the bowl with plastic wrap. Allow the dough to rest in the fridge until needed. If the dough is to rest for more than 1 day, then gently stir the dough with a fork every 8 hours or so to punch down some holes.
Stir the pre-ferment and punch it down once. Allow to continue chilling in the fridge.
Day 3
- Take half of the pre-ferment out of the fridge and allow to warm up on the counter.
- To prepare the soaker: Mix the whole wheat flour, butter milk powder, salt in a medium bowl. Then add water in small quantity until the mixture becomes a soft dough with medium hydration.
- Allow both the pre-ferment and the soaker to sit on counter for at least 2 hours. The pre-ferment may grow a bit, but not too much.
- To prepare the final dough:
- Mix salt, oat bran and yeast together in a large bowl.
- Add to the large bowl the warmed pre-ferment and the soaker. Mix all the ingredients very well so that the pre-ferment and the soaker are fully blended together. Knead the dough for 5-10 minutes.
- Then add honey and oil. Knead the dough for a few minutes to make sure the wet ingredients are blended in.
- Allow the dough to rest in room temperature or in a slightly warmed oven (the oven can be warmed by turning it on to 150F for 10-15 seconds). When the dough has increased its size to 1.5 times, stir it a little with a fork. Then pour it into a greased 3.5"x7.5" loaf pan.
- Sprinkle some oat bran on top of the dough. Sprinkle water to moisten the oat bran. Allow the dough to proof in the loaf pan until the dough has risen to 1.5 times its volume again. The loaf pan may be kept in the warmed oven to speed up the proofing time.
- Preheat oven to 450F.
- Bake loaf at 350F for 30 minutes.
Results:
Day One 8:39pm, pre-ferment's volume after chilling 10 hours:

Day One 8:39pm, pre-ferment's non-stickiness to the bowl after chilling 10 hours:

Day One 8:40pm, pre-ferment's strength after chilling 10 hours:

Day One 8:43pm, pre-ferment punched down:

Day Two 10:29pm, pre-ferment's volume after 34 hours of chilling:

Day Two 10:30pm, pre-ferment's non-stickiness after 34 hours of chilling:

Day Two 10:30pm, pre-ferment's strength after 34 hours of chilling:

Day Two 10:30pm, pre-ferment's gluten development after 34 hours of chilling:

Day Two 10:34pm, pre-ferment punched down:

Day Three 8:39am, pre-ferment on the third morning (after 48 hours of chilling):

Day Three 9:03am, soaker mixed:

Day Three 11:40am, pre-ferment and soaker rested for 2 hours on the counter at room temperature 72F:

Day Three 11:45am, pre-ferment and soaker at initial stage of mixing:

Day Three 11:55am, pre-ferment and soaker mixed for 10 minutes:

Day Three 12:28pm, final dough ready to rest:

Day Three 1:13pm, final dough having rested in warmed oven for 40 minutes:

Day Three 1:16pm, final dough poured into 7.5"x3.5" greased loaf pan, added toppings, and waiting to proof:

Day Three 1:51pm, final dough proofed for 30 minutes (expanded but looked really flat):

Day Three 2:10pm, loaf baked 20 minutes (midway through):

Day Three 2:22pm, loaf baked 30 minutes (observe the large oven spring):

Day Three 2:24pm, loaf's bottom:

Day Three 2:24pm, loaf's side:

Day Three 2:26pm, loaf's Top:

Day Three 5:05pm, loaf being sliced, observe the thinness and the strength of the slices to stand:

Day Three 5:10pm, one loaf yielding 19 thin slices:

Day Three 5:10pm, a center-of-loaf slice (observe the large hole in the middle despite that the dough had been vigorously kneaded):

Day Three 5:10pm, an end-of-loaf slice (compare it with the center slice):

Observations:
1. This time, my loaf has 2/3 whole wheat flour, 1/3 unbleached flour. While resting and proofing, the dough looks a little flat (unlike white loaves). The oven spring of this loaf surprises me greatly.
2. In total, the amount of yeast used is 1/2 tp from half of the pre-ferment, and 1/8 tp during the mixing of the final dough. It's impressive to me how little the amount of yeast is used to give this oven spring and soft crumb. The 2-day pre-fermentation must have done the job.
3. In this loaf, I notice a few large holes in the crumb, even though the dough has been kneaded really vigorously when the pre-ferment and the soaker are mixed. Such mixing is necessary to make sure the two blend. I have kept both the pre-ferment and the soaker a little on the moist side so that the mixing is easier.
4. I really like the texture and the mouth-feel of this loaf. The particular combination of salt, honey and oil give it a great flavor. With a higher percentage of whole wheat flour, the loaf has a richer taste of grain, too.
5. I use a smaller pan because in total there are only 3 cups of flour in this loaf.
6. On the whole, this loaf is my big new step towards whole grain bread baking.
Subscribe to:
Posts (Atom)